KNIT A TRAVEL THROW |
Here is a small, thick, cushiony car throw, made to look like a bed-roll. It also makes a great travel dog bed. Contributions welcome. |

Hand-Knit "Bed-Roll" Car Throw Instructions
This project uses 3 strands of standard acrylic worsted-weight yarn (nothing fuzzy or fancy) and #15 needles. You'll need approximately 3 8-oz skeins. The finished product is approximately 34" x 40+" (the one in the photo is 24" x 40"). By using 3 strands at once, the knitting comes out about 1/2" thick and spongy--perfect for a sit-upon on a hard floor or rock. It's also great as a lap robe or foot warmer. The portable style is ideal for the car. It's also economical, since the least expensive yarn works best.
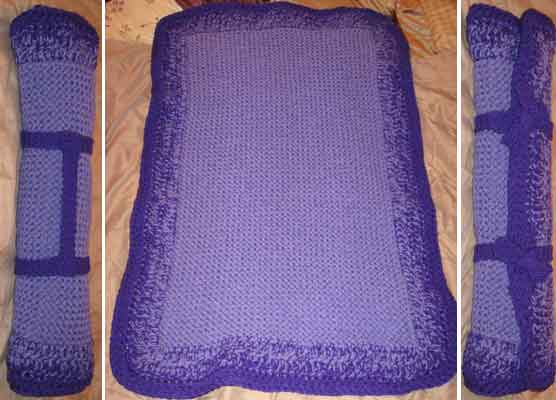
The photo shows the first one I made, when I wasn't sure how far my yarn would go, so I ended up with a wide double-crochet border, which is kind of ruffly and feminine. The following directions are for a larger size, without the border, which would be suitable for a man or boy, too.
1) Using 3 8 oz skeins of 4-ply worsted weight acrylic yarn, pull out about 95" of yarn from each skein to cast on. Holding the short end in front, cast on 75 stiches using #15 needles and all 3 strands. This is very bulky knitting, so it's a little bit clumsy, but it goes really fast.
Hint: If you use the "pull-out" ends from the 3 skeins, instead of the easy-to-find outer ends, you can then bind the skeins together with an ace bandage or spandex knee wrap (or something similar) to keep the yarn from going every which way as you knit. Even a plastic grocery bag tied around them will work.
2) Knit! That's it! (Garter stitch)
3) When you reach the desired size, bind off. Be sure to leave enough yarn for the straps and handle.
Optional: Using a large crochet hook, make 1 row of single crochet around the edges, for a finishing touch. Hint: When you crochet down the sides, slip the crochet hook under the top 2 knit stitches, NOT along the edge "between the bumps." This keeps your knitting from stretching out, but it also creates right and wrong sides to your work.
STRAPS AND HANDLE
Using 1 strand of yarn and #10 needles, cast on 5 stitches. Knit a strip approximately 29" long. (It will stretch way out when you tie it tightly around the rolled up throw). Bind off and repeat this step for the second strap. For the handle, you could add a few extra stitches for a wider handle, or use the same 5 stitches so it will match the straps. The handle should be about 8" long. Using matching yarn and a tapestry needle, stitch the handle to the center of the 2 straps to make an H shape (like shoulder straps on an apron or child's overalls).
Optional: Stitch the straps to one end--or the middle--of the throw. If the straps and handle aren't connected, they could get lost. OTOH, if they are connected, they could get in the way during use. ???
Design Idea:
I love a morphing look, so I'm using 3 different but complimentary colors, in 3 different lengths.
A) I start with all 3 of the same color and approximately 8 oz altogether, with each ball being a different length.
B) Start knitting. When the shortest strand runs out, I add the longest strand of color #2, so I now have 2 strands of #1 and 1 strand of #2.
C) When the 2nd strand runs out, I add another strand of color #2, but I'm careful to use a skein that has either less or more on it than I have left on the 1st skein I added. I don't want these to come out even. Now I have 2 strands of #2 and 1 strand of #1.
D) When strand 3 runs out, I add the last of color #2, so now I've "morphed" from color #1 into color #2.
E) When the first of color #2 runs out, I repeat the process with color #3. By the end of the piece, I've morphed into a solid piece in color #3.
To see how this works, look at the border on the photo above. I used this technique to go from solid lavendar to solid purple.
If you try this project, please share your results. I'd love to post your photos, here.
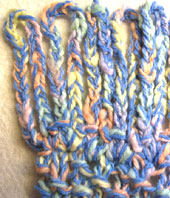 CROCHET FRINGE
BACKGROUND IMAGES |


Susan Molthop
All Rights Reserved