|
Instructions for EZ Knit Wastebasket Covers: Using size 7 needles, cast on 15 stitches. if you don't have 7s, I'd go a little larger rather than smaller. If you're working in a pattern that comes out to a few more or less stitches, that's okay, too. This is a very flexible project. Continue knitting until your work will stretch around the top of your wastebasket. Don't make it too loose. You want a nice, snug fit. Bind
off, stitch it up, and you're done. Or you can try this (all photos
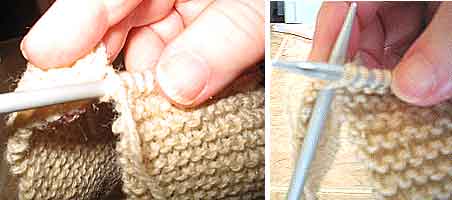
are left-handed): Bring the "tail" of your work up to meet the top. With the needle that's holding the stitches, bring the first stitch from the bottom onto your needle. With
the other needle, knit those 2 stitches together. Go back to the other needle and get the next stitch from the tail. Again, knit those 2 stitches together. On
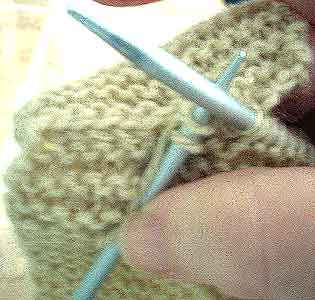
the 2nd needle, pull the first stitch over the second stitch in a standard
bind-off. Continue this way until you've seemed the whole thing together, binding off as you go. When you reach the end, snip off the yarn with about 2 inches to spare, pull the yarn through the last loop, pull it tight, tuck it in on the back side, and you're finished. This idea isn't any better or faster than binding off and stitching up, but if you don't have a tapestry needle handy, it allows you to finish the project in one sitting with just the tools at hand. |
|