Knitting From the Middle Out
When I knit, it's usually with leftover yarn and an improvised pattern. The result is that I often get to the end of a scarf or afghan and run out of yarn or want to make a change to my pattern. Adding another color or changing something at the end is no problem, but going back and changing something at the beginning is a royal pain in the backside. My solution is to start in the middle and work my way out, so I can make changes to both ends of my project and keep them even. Another use for this technique is to start a project this way, with a tail long enough for 2 extra rows. Then you can knit one row on the bottom half and bind off. This eliminates the problem of having the cast-on row tighter than the bind-off row. You can then go back to the top side and knit as usual.
Here is how I do it:
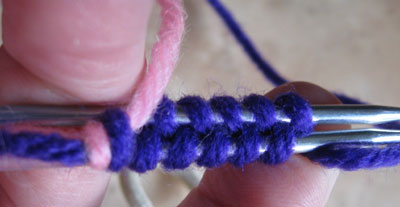
Start with two circular needles of the same very small size (I used size 2). Tie the ends of 2 balls of yarn together (or leave a long tail), so you can work out in both directions. Hold the 2 needles next to each other and weave one strands of yarn between the two needles until you have the desired number of loops on each needle--these will become your stitches.
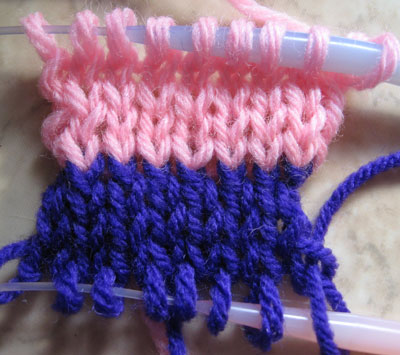
When you have the right number of "stitches", leave the bottom half hang down, while you knit the top half. (This is why I use circular needles--you can move your work to the middle and let the ends hang down, without fear of having your stitches slip off or having the bottom needle get in your way while working on the top.)
Change to the proper size needles for your project. (You only used the smaller needles so there wouldn't be a space to show where you started this technique--if you're using bulky or novelty yarn, you may not need to use the smaller needles for weaving.)
Your first stitch won't have an anchor, since it's only a loop, so you'll need to wrap it around the bottom needle, first. (Count your stitches here, so you don't end up with one more on the bottom than you have on the top.) This is a clumsy process, but it works beautifully and is only necessary for the first stitch on each half.
Knit across the first row. Your work may be loose, since these are just loops you're knitting into.
When you finish the first row on the top half, repeat the process on the bottom half, using the tail or the other strand. Be careful not to lose the first stitch, since it's really only a loop around the needle. You may need to practice this a few times until you get the hang of it.
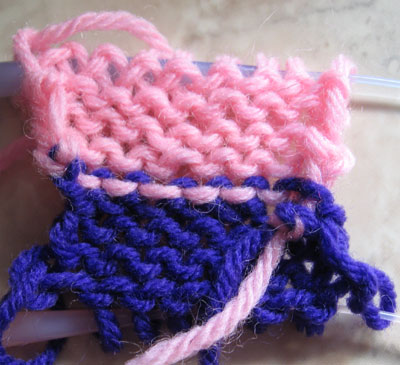
This gives you the start of a stockenette pattern and a seamless transition for working in 2 directions. If you don't use smaller needles for the weaving cast-on, you may see a small space where the weaving occured. (The photos were taken after a few more rows of stockinette stitch.)
The back side looks as good as the front.
From here on, you can modify the stitch pattern to suit your project. If you want to continue in stockinette, the next row, top or bottom, will be a purl row.
Thanks to my friends at the KnittyHelp forum for correctly identifying this technique as a "provisional cast-on."
Copyright 1995-2008 Susan
Molthop
All Rights Reserved
Contact