CountryNaturals.com >Knitting
"Inside-Out"
Footies--Variations
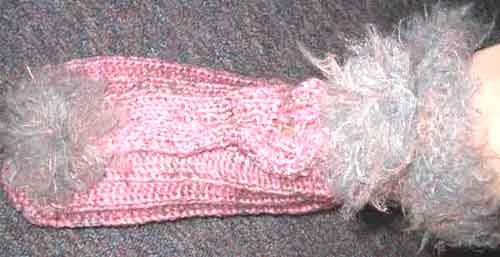 |
This one I made for our daughter. The yarn isn't as heavy so I doubled
up on the sole, which made it more time-consuming.
The specialty fur yarn was so fine I couldn't keep track of the pattern,
so I just knitted and let it be floppy like a slouch sock.
|
|
 This
one I made for my husband. He likes a high, open cuff, so I left it that
way, but it could be stitched up or rolled down. If the cuff is too loose,
you can run elastic thread through it at the ankle, the top, or both. This
one I made for my husband. He likes a high, open cuff, so I left it that
way, but it could be stitched up or rolled down. If the cuff is too loose,
you can run elastic thread through it at the ankle, the top, or both.
The only difference between a man's and a woman's is the length. When
you stitch them up, the woman's has a wider seam, to make it look more
like a ruffle.
These can also be made for children. Scroll down to the bottom of the
page for sizing info.
|
Inside-Out Hand-Knit Footies
Instructions
(one size fits most adults--see hint at bottom for children's sizing)
Materials Needed:
2 Skeins (3-4 oz each) worsted weight yarn (you'll have some left
over, but one skein will probably not be enough)
1 skein contrasting color for cuffs and trim (optional). Cotton
yarn is not recommended for this project--it isn't stretchy enough. If
you only have sports weight or baby yarn, use 2 strands as one. I did that for
the cuffs of the man's footie and it worked fine, but knit up a sample, first,
to be sure your yarn has the right look and feel.
Size US 6 knitting needles
Large-eyed, bluntnosed sewing needle
Elastic thread
Directions (starting at the top--ending at the toe):
Cast on 49 stitches using the yarn you've chosen for the
cuffs. It can be the same or contrasting to the rest of the footie. If you're
using a specialty yarn, such as the fur trim in the top photo, it might be difficult
to stick to even the simple rib stitch used here. I gave up and just used straight
knitting for the slouch top in that shot, since that fur was so fine and difficult
to work with. In the third and fourth photo, you can see how it looks using
standard yarn and the ribbed stitch.
Row One: K1, P2, K1 across row
Row Two: P1, K2, P1 across row
Work in pattern until footie measures approximately 3". This is the cuff.
If you want a high-top or slouch footie, make this part longer. If you like
ankle-length, make this part shorter. When in doubt, longer is better. You can
always fold them down, but if they're too short, you won't be happy with them.
If you're using a contrasting color, switch to the main color,
now.
If you're going to reinforce the sole, work in pattern for 15
stitches, then add the second strand. Use the contrasting color, or even a thrid
color, for added interest. Work in pattern through stitch 34, then drop the
second strand, leaving it at the back, to make it easier to pick up again on
the next row.
Continue working in pattern until the main part of the footie
measures 11" for a woman, 12" for a man. This is NOT counting the
3" cuff, so if you didn't change yarn, and you want a 3" cuff,
your total length would now be 14" for a woman, or 15" for a man.
Now it's time to decrease for the toe section.
At the beginning of the next row, K2 together, twice. Knit in
pattern until you reach the last 4 stitches, then K2 together twice again. This
reduces each row by 4 stitches.
Continue in this manner until you have only 5 stitches left. NOTE:
If you doubled the yarn for the sole, tie off the 2nd strand when the the decrease
reaches the double thickness, then continue with a single strand.
When you have 5 stitches left, K2 together, K1, K2 together. This
leaves 3 stitches.
K2 together, K1. Now you have 2 stitches.
K2 together. Last stitch.
Cut off the yarn, leaving about 10" for stitching. Pull the
yarn through the last stitch to fasten it. Your knitting is finished.
Now it's time to sew.
Thread the yarn through the big-eyed sewing needle. With the knit
side in (purl side out) bring one of the side points (where you started decreasing)
up to the center point (where you just finished binding off ) and stitch theem
together, making a flat seam. Tie off and cut. Repeat this process with the
other side. You now have an "envelope" for your toes. (See the bottom
left photo.)
Switch to elastic thread in your needle. Pull up the sides to
the first purl rib for a man, or the 2nd purl rib for a woman, and stitch up
the sides, using small running stitches, pulled securely, so you don't get gaps
when you wear the slippers. This is the main reason for stitching these slippers
inside out. The knit side (right side) of this pattern naturally rolls in, so
when you stitch in the purl groove, the edges roll over your stitching, forming
a natural finish. By using the first groove for a man and the 2nd groove for
a woman, your footie should fit well. The wider seam in the lady's slipper also
looks more like a ruffle, giving additional style to the finished product.
When you reach the cuff, you can either tie off your work and
leave a split up the front of your cuff, or continue stitching all the way up.
(On my top sample, I wanted a slouch look, so I stopped the elastic thread and
used the same fur yarn to stitch up the cuff, giving a seamless look.
For a lady's footie, I put a yarn pompom at the toe and at the
base of the cuff. This is strictly optional, but it does help cover up the hand
sewing.
If the top turns out too loose, or if the footie tends to slip
down as you wear it, weave in a couple of rows of elastic thread around the
top and bottom of the cuff. I did NOT have this problem with standard yarn and
the ribbed pattern, but specialy yarns can be unpredictable, so this step might
be necessary if your cuffs are done with something exotic.
Hint for sizing:
Width adjustment: Cast on a multiple of 3 stitches plus
one. The adult size measures about 9 1/2" across without stretching. Measure
the child's foot at the biggest part--around the heel--to get an idea of how
big to make it. My sample measures approximately 2 complete ribs to the inch--that's
P1, K2, P1, K2, P1. If your width measurement is off a little, you can fudge
on the seam, making it wider or narrower as needed.
Length adjustment: Have the child stand barefoot on your
tape measure, with toes at the end. Notice the length from the end of the foot
back to the tip of the little toe. This measurement will be subtracted from
the total, so you'll know where to start decreasing. Continue running the tape
up the back of the foot and notice where the heel goes in at the ankle. That's
your main length--from the tip of the little toe to the ankle. Then continue
measuring up the back of the leg to where the top of the cuff should end. That's
the cuff length.
 Home
Home